Admin
The Admin page appears with a single browser bar at the top of the page. This page is a home page for all of the administrative care that is necessary for formatting and maintaining a functional CSM. Each of the following headings allow you to personalize and keep you CSM up-to-date.
Departments: Allows you to personalize the Departments available in your CSM.
List Departments: This is the default open page under Departments. It opens to a chart of all of the created Departments with following headers:
Del: This gives you the option to delete and completely remove a Department from your CSM.
Name: The name of the Department, as designated upon creation.
Clicking on the name of the Department will bring you to the following menu:
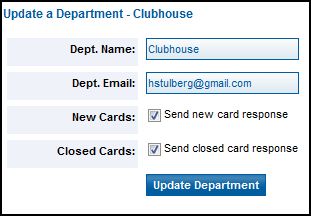 Dept. Name: Allows you to edit and/or update the name of the Department
Dept. Email: Allows you to change or assign an email to the Department. This would be necessary if the department head changes, to ensure that all appropriate emails are reaching the correct person.
New Cards: Allows you to choose whether or not you wish to send new card responses.
Closed Cards: Allows you to choose whether or not you wish to send closed card responses.
Once you have completed entering the needed information, click on Update Department. If there are no changes being made, either click on Update Department or on the List Departments button above the menu to return to the List of Departments page.
Email: The contact email address associated with this department.
Categories: The number of Categories associated with this particular Department. These are often sub-groups of the more general Departments.
Clicking on the number will redirect you to a list of the associated Categories:
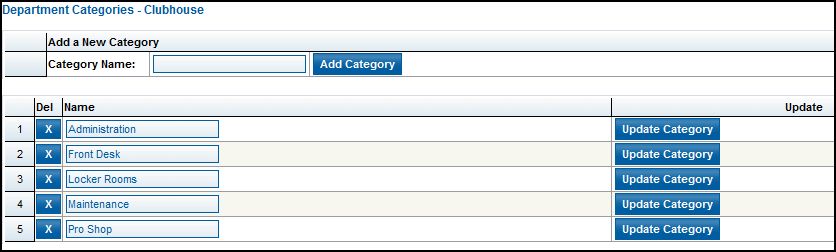
Add Category: To Add a New Category, enter the name in the space provided next to "Category Name" and click on "Add Category". It will automatically be filed alphabetically by Category Name. The Category number is assigned automatically based on the alphabetical listing.
Del: Allows you to delete this category
Name: Lists the names of the Categories in descending alphabetical order. The names are editable in this space. To change the name simply type in the new name, or make corrections to the name and click on "Update Category" in the next column to the right.
Users: The number of associated Users, for this particular department.
Clicking on the number will redirect you to a list of the associated Users:
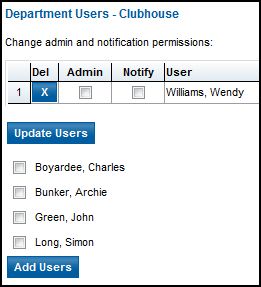
Update Users:
Del: Allows you to delete a User from the list of associated users.
Admin: Allows you to determine whether an associated will be considered an administrator of that department. They do not automatically receive an email when a card is submitted, but are able to be part of those who resolve cards directed to the department.
Notify: Allows you to determine whether an associate will be notified when cards are submitted to that department. All users checked with "notify" will receive an automatic email each time a card is submitted.
Note: If there are no names in "Notify" who will receive emails from that department, an email will be sent to the emails set as default email addresses in General Settings.
User: Provides the name of the associated Users.
Once you have made any changes necessary, click on "Update Users" to save the changes.
Add Users:
If you wish to add a user to the list of associated users, select the checkbox next to their name and click "Add Users". You can add as many Users as necessary.
Add Department: The Add Department menu is nearly identical to the Update a Department menu found above. Fill in the necessary settings and click on Add Department to add a new Department to your list.
Card Types: Allows you to personalize the Card Types available in your CSM.
List Card Types: This is the default menu when you open "Card Types":
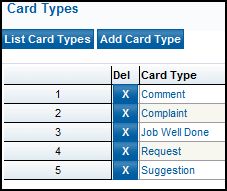
Cards are automatically listed alphabetically by Card Type name. The number associated with each card type is assigned automatically based on this alphabetical ordering.
Del: Allows you to delete the associated Card Type by clicking on the blue "x".
Card Type: Displays the Card Type names in descending alphabetical order.
Clicking on the Card Type name allows you to update and change the listed name.
To change the name simply edit the entry and click on "Update Card Type" to save the changes.
Add Card Type: The Add Card Type menu is nearly identical to the "Update Card Type" menu. Fill in the necessary field and click on "Add Card Type" to add a new Card Type to your list.
Card Statuses: Allows you to personalize the Card Statuses available in your CSM.
List Statuses: This is the default menu when you open "Card Statuses":
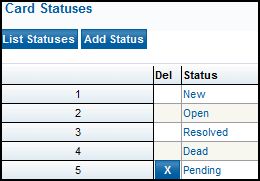
Card Statuses are automatically listed alphabetically by Card Status name. The number associated with each card status is assigned automatically based on this alphabetical ordering.
Del: Allows you to delete the associated Card Status by clicking on the blue "x".
Status: Displays the Card Status name in descending alphabetical order.
Clicking on the Card Status name allows you to update and change the listed name.
To change the name simply edit the entry and click on "Update Status" to save the changes.
Add Status: The Add Status menu is nearly identical to the "Update Status" menu. Fill in the necessary field and click on "Add Status" to add a new Status to your list.
Card Priorities: Allows you to personalize the Card Priorities available in your CSM.
List Priorities: This is the default menu when you open "Card Priorities":
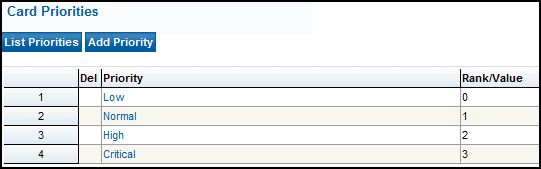 Del: Allows you to delete non-standard Card Priorities by click on the blue "x".
You can not delete standard priorities (Low, Normal, High and Critical)
Priority: Lists the Priority Names in order of their assigned Rank/Value.
Clicking on the Priority Name allows you to update and change the listed name.
To change the name simply edit the entry and click on "Update Priority" to save the changes.
Rank/Value: This determines the value of each Priority on a continuum with 0 being the lowest priority and the highest number (as determined by how many priorities you create) being the highest priority. The Rank/Value is assigned when creating a Priority.
Add Priority: The Add a Priority menu is nearly identical to the "Update Priority" menu. Fill in the necessary fields and click on "Add Priority" to add a new Priority to your list.
General Settings: Allows you to personalize the General Settings of your CSM.
Email Server: This sets the Server that the email address assigned to receive emails regarding Comment Cards is hosted on.
Email Address: This allows you to set the email address that all Comment Card activity is filtered through. When a card is submitted, CSM automatically sends out an acknowledgement email to the submitter including an ID# for their card, which they can refer back to. A notification is then sent to all Users associated with the designated department. All emails sent in reply to these acknowledgement and notification emails are filtered through CSM. If a member responds directly to an automated email sent by the system, it will be filtered through this email, and added into the CSM card history attached to the relevant card. In the same way, responses sent by Users either directly to their notification email or through the CSM system are also filtered through this email, ensuring that none of the history is lost and there is always an accurate record of all CSM activity.
This system allows both users and members to interact through the CSM in a way that is user friendly, simple and efficient.
Note: This email should be a dedicated email created only for use by the CSM as Buz will automatically transform all emails sent to this address into comment cards and remove them from the inbox. It must be a POPmail email address.
Email Username: This is the username for the selected Email Address.
Email Password: This is the password for the selected Email Address.
Note: Once you have completed the above settings, click on the "Test Email Account" button situated at the top of the menu to test that Buz CSM is able to connect with your email address. If it is unable to connect, it will be unable to send/receive emails automatically.
Show Tasks: This allows you to toggle whether you wish to show Tasks associated with cards or not.
Show Unassigned: This allows you to toggle whether you wish to show Unassigned cards or not.
Show Stats: This allows you to toggle whether you wish to show Stats or not.
Show ALL Unassigned: This allows you to toggle if all Users are able to see cards which are unassigned to a user, even if they are not associated with the department to which the card is directed.
Auto Send/Receive Email: This allows Buz CMS to automatically send/receive Emails.
Default Recipient List: This list will receive all card notification emails from each department that does not have a user assigned under "Notify".
Email Exception List: This list allows you to halt all automatic emails to certain email addresses.
This is useful if someone has submitted a card and then set an "auto-reply" on their email. Since CSM automatically send out an acknowledging email, this "auto-reply" would send an auto response, CSM would respond with another automated email, catching into a loop. Adding their email address to this list will stop the cycle.
Also, if your company has a voicemail set up that automatically creates Cards, adding the voicemail email address to this list will stop the system from attempting to send an acknowledging email to your voicemail.
New Card Response: This allows you to customize the acknowledging email that a member receives when they submit a new card.
Closed Card Response: This allows you to customize the confirmation email that a member receives when a card that they submitted is closed (marked as resolved).
Note: if a member response to this response the card will automatically be re-opened and the Status will change to "Open", allowing it to be visible on the Home page and allowing further action to be taken regarding it.
User Interface: Allows you to personalize the Settings regarding the User's interaction with your CSM.
Note: These settings are just the default settings for Comment Card pages, as all settings are now done on a per page basis. For more information on Comment Card page settings, see Buz CMS > Page Types > CMS Page Types > Comment Card Submission in the Reference Guide.
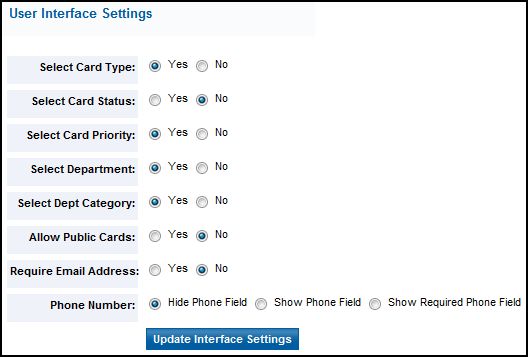 Select Card Type: Allows you to determine whether the user will or will not be able to select the Card Type.
Select Card Status: Allows you determine whether the user will or will not be able to select the Card Status. If no, new cards will automatically be filed as "New".
Select Card Priority: Allows you to determine whether the user will or will not be able to select the Card Priority.
Select Department: Allows you to determine whether the user will or will not be able to select which Department the Card will be directed towards.
Select Dept Category: Allows you to determine whether the user will or will not be able to select which section of a chosen Department the Card will be directed towards.
Allow Public Cards: Allows you to determine whether the user can post a Card as a Publically viewable card, or not.
Require Email Address: Allows you to determine whether an email address is required when a user creates a card, or not.
Phone Number: Allows you to select if entering a phone number will not be an option, will be an option, or will be required when a user creates a card.
Once you have set the User settings as you wish, click on "Update Interface Settings" to apply and save the new settings.
Check Mail: If General Settings are set to "Auto Send/Receive Email" this process will occur automatically. This button forces the check to go through immediately. This is useful if you have been contacted by a member or user about a card that has not yet been logged into the CSM system. Clicking this button will immediately check the emails, automatically filing all contents into the appropriate Departments and allowing you to view any content that had not been filed yet.
Purge Dead Cards: Allows you to remove cards marked as "Dead" from your system.