Station Settings
To launch Station Settings, click on Station Settings in the POS Settings application group.
.PNG)
Tool Bar (outlined in red)
The Tool Bar contains options for:
- Add
- Edit
- Delete
- Save
- Cancel
- Clone
Add/Modify/Delete
To Add, Modify or Delete a station, select the applicable button on the Tool Bar and complete each of the sections on the form.
General (outlined in blue)
- Description: Click the button with the ellipsis(...) to apply your Windows Login Name to this field. Otherwise manually type in the Windows Login Name of the Station you are configuring.
- F&B Profile: The Profile that will be loaded for this Station when launching the F&B POS.
- Capture Signature: If the check box beside the F&B Profile is selected, servers will be prompted to capture a member's signature when tendering a sale. The is intended to be used in conjunction with table side POS stations. The same check box is available for retail POS.
- Retail Profile: The Profile that will be loaded for this Station when launching the Retail POS.
- Member Gate Checkin Profile: The Profile that will be loaded for this Station when using Member Checkin.
- Accommodations Profile: The Profile that will be loaded for this Station when using the Reservation application in Accommodations.
- Prompt to Print Tendered Receipts: If enabled, a question will be posed asking to print or not when tendering out receipts.
- Rollup Common receipt Items: If enabled, all common items on receipts will be combined (rolled-up).
- Rollup Kitchen Print Items: If enabled, all common items on kitchen chits will be combined (rolled-up).
- Allow Remember Me on BackOffice Login: If the station will only be used by a single individual, then the Remember Me feature will be a convenience
- Radio Buttons for Table Service, Member Service or Choose: When launching F&B POS, the selection will determine in which mode the POS will launch or if the server will be required to choose
- POS Member List Row Height: This setting determines the row height for the member selector in the POS applications. Set the value to height which is convenient for your staff.
- Station Notes: Any extra information that may be entered, such as the physical location of the Station.
Credit Card Processing (outlined in green)
- XCharge/ETS Configuration: These settings are for integrated credit card processing. Currently only ETS (now Elavon Bank) is supported. Please consult with Buz support on these settings.
Printers (outlined in orange)
The printers section is divided into 2 panels, Available Printers Assigned Printers (on the left) and Assigned Printers (on the right).
- Available Printers: The list of Printer Types defined in the Printer Types module. A printer type can be added to the Available Printers list by clicking on it and the clicking on the arrow which points to the left.
- Assigned Printers: Printers ca be assigned to a station by selecting the printer in the Available Printers list and then clicking on the left arrow to assign the printer. The values to be assigned for Type, Hardware Printer and Native Driver are described below.
Type
To set the printer type, right click on the printer and select Set As.

Bar Code Printer
If the station will be printing bar codes from the Inventory Manager, you will require a printer type of Bar Code, which will be subsequently mapped to the report printer for the station.
Retail Printer
If the station will serve as a Retail POS station and will be printing receipts, you will require one printer to be designated as a Retail Printer
FB Printer
If the station will server as a F&B POS station and will be printing receipts, you will require one printer to be designated as a FB Printer
Report Printer
If a station will be printing reports you will require one printer to be designated as a Report Printer
General Printer
Printers to be used for FB prep, should be designated as General Printers
Hardware Printer
To map each printer to an explicit physical hardware printer, right click on the Assigned Printer and select Map Hardware printer.

Select the printer from the list and click OK.
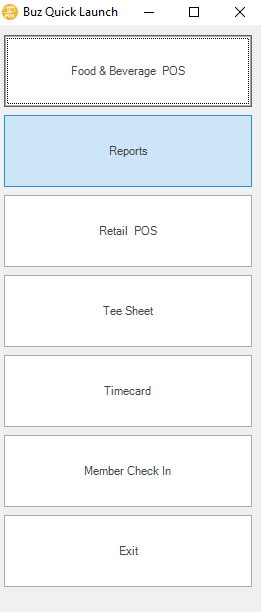
FBLaunch Enabled Buttons (outlined in purple):

There are several applications which can be launched as standalone or from the Buz Club Manager interface. For a station to have access to these applications, they must be checked off. Below is a description of each one.
- Food & Beverage: If enabled, the F&B POS will be available when launching the FBLaunch application.
- Retail: If enabled, the Retail POS will be available when launching the FBLaunch application.
- Tee Sheet: If enabled, the tee sheet can be enabled as a full screen application from the FBLaunch
- Reports: If enabled, the Reports will be available when launching the FBLaunch stub application.
- Timecard: If enabled, the Timecard will be available when launching the FBLaunch stub application.
- Reports: If enabled, the Reports will be available when launching the FBLaunch application.
Note: The Reports option can be very convenient for managers because it enables them to print reports directly from a POS Terminal.
- Member Gate Check in: If enabled, the Member Checkin application will be available when launching the FBLaunch application.
Below is a screen shot of the FBLaunch with all options enabled.
Support Tools (DO NOT USE)
The settings below are for the use of the Buz Support Team to assist in trouble shooting. DO NOT U
- Enabled Screen Recorder: If enabled, an active screen capture application will run in the background, if an exception(error) is thrown while running the application, the last 5 minutes of screen shots will be saved for further review by technical support.
- Enabled Performance Monitor: If enabled, a small application will run alongside the BCM, this small application will display the current Memory and CPU used, similar to what is displayed in the Task Manager for the BCM application.
- Show Report Data Sources: If enabled, when launching any stock reports, a window will appear behind the report that displays the main data source loaded into that report, as well as the script code for the report file.