
Manage GL Accounts
To manage GL Account Groups, select Options/General Ledger/GL Accounts (there will be an alternative way to launch the form from the Outlook bar). Click on the Accounts tab on the top of the form. The following form will appear.
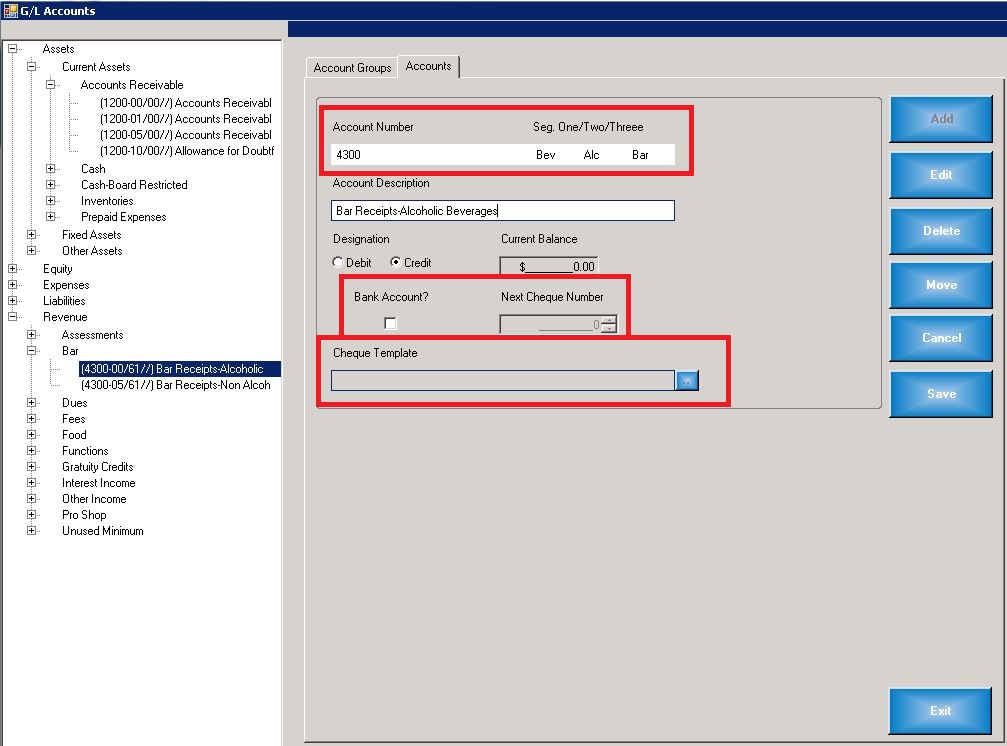
GL Account Structure
Each GL Account record is comprised of a number of fields which affect how the account functions. Below is a detailed description:
- Account Number. As in most accounting systems, each GL account has an account number. In the Buz system the account number can be comprised of up to 20 alpha-numeric characters.
- Segments. Each account number can contain up to three segments. Each segment can contain up to 4 alpha-numeric characters. Segments are useful for assigning GL Accounts to departments, sub-departments and sales areas. In the example provided in the image above, the segments represent Bev = Beverages, Alc = Alcohol and Bar = Bar. This account would be used to track the sale of alcoholic beverages in the bar.
- Account Description. This description represents the name of the account and will be displayed as created in the detailed financial statements.
- Debit/Credit. To be removed.
- Current Balance. This is a display field which shows the current balance of the account.
- Bank Account? By checking this field, the account will be designated as a bank account. Bank accounts have special characteristics including:
- Tracking of check numbers
- Link to a check template for printing of checks.
- Link to the Deposit module for depositing receipts
- Link to the Bank Reconciliation module for reconciling the bank account
- Next Check number. The next check number is recorded here. This value will be used to determine the check number for printing purposes.
- Check Template. This field will link bank accounts to the applicable template for printing checks. Each bank account will have a unique template.
Add Account
To add a GL Account, using the tree-view, navigate to and highlight the GL Account Group which will contain the GL Account. Click on the Accounts tab at the top of the form, then select Add. Complete the form, then click Save.
Modify an Account
To modify an Account- using the tree-view, navigate to and highlight the GL Account which is to be modified. Click on the account, then select Edit. Complete the form, then click Save.
Move an Account
To move an Account to a different GL Account Group- using the tree-view, navigate to and highlight the GL Account which is to be moved. Click on the account, then select Edit. Next, click move. Using the tree-view, navigate to the group to which the GL Account is to be moved and click on the GL Account Group. When the Move Account dialogue box appears, click Yes to accept the move.
Important: Use extreme caution in moving GL Accounts.
Delete a GL Account
To delete a GL Account- using the tree-view, navigate to and highlight the GL Account which is to be deleted, then select the Delete button. When the Delete Account dialogue box appears, click Yes to accept the deletion.
Related Links
Prerequisites